public bool InactiveRecord ( string entity, Guid id )
{
try
{
SetStateRequest req = new SetStateRequest ( );
//the entity you want to change the state of
req.EntityMoniker = new EntityReference ( entity, id );
//what should the new state be
req.State = new OptionSetValue ( ( int ) AccountState.Inactive );
//Pick an option from the status reason picklist to specify reason for state change
req.Status = new OptionSetValue ( 2 );
this.Service.Execute ( req );
return true;
}
catch ( SoapException ex )
{
return false;
}
}
//Call
InactiveRecord ( "account",new Guid( "894CC46A-B0CB-4AB0-8BF6-200544E46A2D") ) ;
Monday, August 29, 2011
Wednesday, August 24, 2011
CRM 2011-Fetch XML To Map Many to Many Relationships
After Create Many to many relationship in crm 2011 it created join entity(Relationship name) in crm data base.
Eg - Account Entity Map With Product Entity using Many to many relationship,then sql create center entity called relationship name(account_product)
When you write the fetch xml to get Account related products the you can use account_product as linked entity.
<fetch version='1.0' mapping='logical' output-format='xml-platform' >
<entity name='account'>
<all-attributes/>
<link-entity name='account_product' from='accountid' to='accountid' >
<all-attributes/>
</link-entity>
</entity>
</fetch>
Wednesday, August 10, 2011
Scheduling automated backup using SQL server 2008
It is very important to take backups for the database files on regular basis. Microsoft SQL server 2008 made this task very easy. In this blog, I am going through step by step that will allow
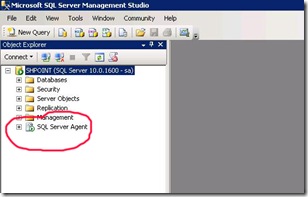
Expand the Management Node from the object explorer, and then select the maintenance plan node. To schedule maintenance plan, you need to have “SYSADMIN” database role. If you dont see the maintenance node, make sure you have the necessary permission.
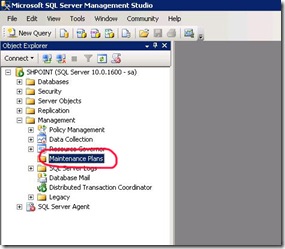
Right click the maintenance plan and then select “new maintenance plan”.

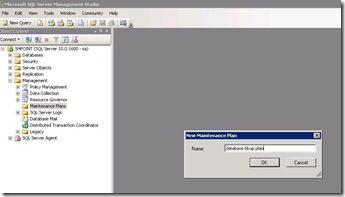
Enter the maintenance plan name in the popup box (This can be any name that identifies your task for ). This will identify your backup plan and you should choose a relevant name that suits your plan.
Now you will be in the configuration page for the maintenance plan. . Note the marked area, these are the two areas you need to use for setting up the maintenance plan. The marked area in the right top will be used to configure the time that the plan executes. Choose a time so that the database is least used. The bottom left pane shows the tasks that can be utilized to create an sql maintenance plan. since explaining all of them is not in the scope of this document, I am going to explore only two of them.
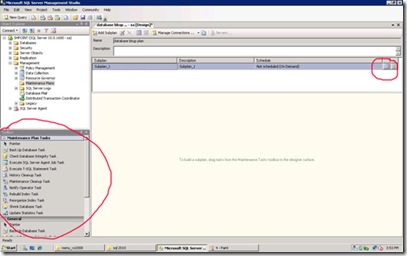
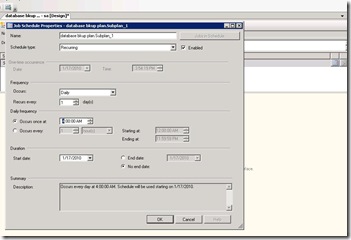
Click on the calendar item shown in the right side top. This will bring the job schedule properties popup window that configure the execution time/frequency of the tasks. Configure the data carefully so that it suits your requirement. Usually database backups are taken daily basis. Make sure you are selecting proper time so that your database is least used. Click ok once you finish.
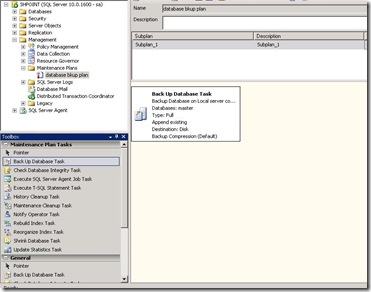
From the maintenance plan tasks pane in the left side, select the backup database plan, this will be used to take backups for the databases. Drag and drop backup database task to the right side(as shown in the diagram).
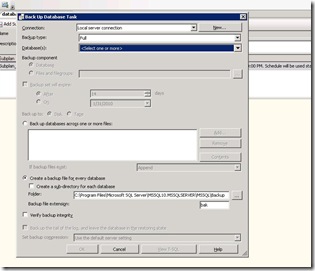
Double click on the backup database task, it will open up a new window that allows you to configure the database configuration for the backup. Here you configure the databases that you need to backup, then specify a location for the backup, specify the extension for the backup files etc.
From the pop up modal window, by clicking on “Databases” dropdown, you will be able to select the required databases. Also configure the file location, extension for the backup file etc.
Click ok once finished. Now backup plan configuration is over. The backup files will be created on the scheduled time to the mentioned folder. The name of the file will be created by appending the date so that you can identify the back up for a particular date.
Since the backup files are created frequently,… it is a good practice that you delete backup files after a certain period of time. For this you need to execute clean up task along with the maintenance plan. You can configure the clean up task as follows.
From the left side pane, drag and drop maintenance cleanup task.
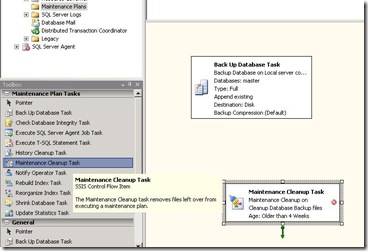
Double click on the dropped item inorder to edit the clean up properties. Here you need to specify the backup location, and file extension for the back up files and specify the age of the file. It is a good practice that you keep one month old data, and delete anything prior to one month.
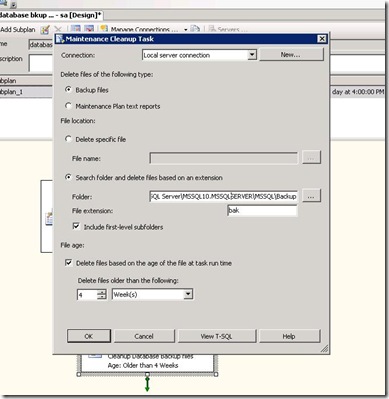
Once you click ok, then save the maintenance plan. You can either wait till the next execution time or execute it manually inorder to check whether everything is working fine.
This Content Refer From http://weblogs.asp.net/sreejukg/archive/2010/01/20/scheduling-automated-backup-using-sql-server-2008.aspx
- Users to schedule the backup to be taken on a particular interval
- Delete the backup copies after a certain period of time
Schedule the database backup
First I am going to tell you the steps required to schedule the backup. Login to Sql Management studio and connect to the required database. Now from the object explorer, make sure SQL server agent is running, if not start SQL server agent(Right click and press start).
Expand the Management Node from the object explorer, and then select the maintenance plan node. To schedule maintenance plan, you need to have “SYSADMIN” database role. If you dont see the maintenance node, make sure you have the necessary permission.

Right click the maintenance plan and then select “new maintenance plan”.

Enter the maintenance plan name in the popup box (This can be any name that identifies your task for ). This will identify your backup plan and you should choose a relevant name that suits your plan.

Now you will be in the configuration page for the maintenance plan. . Note the marked area, these are the two areas you need to use for setting up the maintenance plan. The marked area in the right top will be used to configure the time that the plan executes. Choose a time so that the database is least used. The bottom left pane shows the tasks that can be utilized to create an sql maintenance plan. since explaining all of them is not in the scope of this document, I am going to explore only two of them.

Click on the calendar item shown in the right side top. This will bring the job schedule properties popup window that configure the execution time/frequency of the tasks. Configure the data carefully so that it suits your requirement. Usually database backups are taken daily basis. Make sure you are selecting proper time so that your database is least used. Click ok once you finish.

From the maintenance plan tasks pane in the left side, select the backup database plan, this will be used to take backups for the databases. Drag and drop backup database task to the right side(as shown in the diagram).

Double click on the backup database task, it will open up a new window that allows you to configure the database configuration for the backup. Here you configure the databases that you need to backup, then specify a location for the backup, specify the extension for the backup files etc.
From the pop up modal window, by clicking on “Databases” dropdown, you will be able to select the required databases. Also configure the file location, extension for the backup file etc.

Click ok once finished. Now backup plan configuration is over. The backup files will be created on the scheduled time to the mentioned folder. The name of the file will be created by appending the date so that you can identify the back up for a particular date.
Since the backup files are created frequently,… it is a good practice that you delete backup files after a certain period of time. For this you need to execute clean up task along with the maintenance plan. You can configure the clean up task as follows.
From the left side pane, drag and drop maintenance cleanup task.

Double click on the dropped item inorder to edit the clean up properties. Here you need to specify the backup location, and file extension for the back up files and specify the age of the file. It is a good practice that you keep one month old data, and delete anything prior to one month.

Once you click ok, then save the maintenance plan. You can either wait till the next execution time or execute it manually inorder to check whether everything is working fine.
This Content Refer From http://weblogs.asp.net/sreejukg/archive/2010/01/20/scheduling-automated-backup-using-sql-server-2008.aspx
Sunday, August 7, 2011
How to Apply ampersand (&) in XML
User This Text
Refer >>>
http://en.wikipedia.org/wiki/List_of_XML_and_HTML_character_entity_references
&, ", <, >&, ", <, >Refer >>>
http://en.wikipedia.org/wiki/List_of_XML_and_HTML_character_entity_references
CRM 2011 - Change Subgrid View Java Script
Use This java script On Form Load...
Change the Fetch XML and set the subgrid ID
function UpdateSubGrid()
{
var leadGrid = document.getElementById("Contact");//Set Subgrid ID
//If this method is called from the form OnLoad, make sure that the grid is loaded before proceeding
if (leadGrid.readyState != "complete")
{
//The subgrid hasn't loaded, wait 1 second and then try again
setTimeout('UpdateLeadSubGrid()', 1000);
return;
}
var fetchXml = " ";//Set Fetch XML
//Inject the new fetchXml
leadGrid.control.setParameter("fetchXml", fetchXml);
//Force the subgrid to refresh
leadGrid.control.refresh();
}
Change the Fetch XML and set the subgrid ID
function UpdateSubGrid()
{
var leadGrid = document.getElementById("Contact");//Set Subgrid ID
//If this method is called from the form OnLoad, make sure that the grid is loaded before proceeding
if (leadGrid.readyState != "complete")
{
//The subgrid hasn't loaded, wait 1 second and then try again
setTimeout('UpdateLeadSubGrid()', 1000);
return;
}
var fetchXml = "
//Inject the new fetchXml
leadGrid.control.setParameter("fetchXml", fetchXml);
//Force the subgrid to refresh
leadGrid.control.refresh();
}
Tuesday, August 2, 2011
Pass xml to WCF Rest Service
In Data Contract >>Activity is Custom Object Format
[OperationContract ( Action = "ReadyMembershipAPI/CreateActivity" )]
[FaultContract ( typeof ( ApplicationException ) )]
[WebInvoke ( Method = "POST",
ResponseFormat = WebMessageFormat.Xml,
RequestFormat = WebMessageFormat.Xml,
BodyStyle = WebMessageBodyStyle.Bare,
UriTemplate = "CreateActivity?requestToken={requestToken}" )]
Guid CreateActivity ( string requestToken, Activity activity );
In Service.svc
public Guid CreateActivity ( string requestToken, FIAActivity activity )
{
Guid activityID=Guid.Empty;
//Implement Your Code ;
return contactHandler.CreateActivity ( organisationName, activity.ContactID, activity.ActivityType,( activity.ActivityDate), activity.Label, activity.Description );
}
{
Guid activityID=Guid.Empty;
//Implement Your Code ;
return contactHandler.CreateActivity ( organisationName, activity.ContactID, activity.ActivityType,( activity.ActivityDate), activity.Label, activity.Description );
}
In Activity Object
[DataContract ( Namespace = "http://schemas.datacontract.org/2004/07/TestAPI/" )]
public class Activity
{
[DataMember ( Order = 1 )]
public string ContactID { get; set; }
[DataMember ( Order = 2 )]
public string ActivityId { get; set; }
[DataMember ( Order = 3 )]
public string ActivityType { get; set; }
[DataMember ( Order = 4 )]
public DateTime ActivityDate { get; set; }
[DataMember ( Order = 5 )]
public string Label { get; set; }
[DataMember ( Order = 6 )]
public string Description { get; set; }
}
Access The Service>>>>
Host Service As
http://localhost:35798/RestServiceImpl.svc/
Then Access
HttpWebRequest req = null;
HttpWebResponse res = null;
HttpWebResponse res = null;
const string url = "http://localhost:35798/RestServiceImpl.svc /CreateActivity?requestToken=tokenabc";
req = ( HttpWebRequest ) WebRequest.Create ( url );
req.Method = "POST";
req.ContentType = "application/xml; charset=utf-8";
req.Timeout = 30000;
req.Headers.Add ( "SOAPAction", url );
var xmlDoc = new XmlDocument { XmlResolver = null };
xmlDoc.Load ( Server.MapPath ( "PostData.xml" ) );
string sXml = xmlDoc.InnerXml;
req.ContentLength = sXml.Length;
var sw = new StreamWriter ( req.GetRequestStream ( ) );
sw.Write ( sXml );
sw.Close ( );
res = ( HttpWebResponse ) req.GetResponse ( );
Stream responseStream = res.GetResponseStream ( );
var streamReader = new StreamReader ( responseStream );
//Read the response into an xml document
var soapResonseXmlDocument = new XmlDocument ( );
soapResonseXmlDocument.LoadXml ( streamReader.ReadToEnd ( ) );
//return only the xml representing the response details (inner request)
TextBox1.Text = soapResonseXmlDocument.InnerXml;//Here Retun Guid as xml
PostData.xml >>>>
<Activity xmlns="http://schemas.datacontract.org/2004/07/ReadyMembershipAPI/">
<ContactID>1A7BC156-3FAD-E011-B15A-84CDF3EB186A</ContactID>
<ActivityId>1A7BC156-3F56-E011-B15A-84CDF56B186A</ActivityId>
<ActivityType>TEst00</ActivityType>
<ActivityDate>2002-09-24</ActivityDate>
<Label>Udith</Label>
<Description>Udith</Description>
</Activity>
Subscribe to:
Comments (Atom)